
Both steps need a connected Google account. Set one up first in Google Accounts.
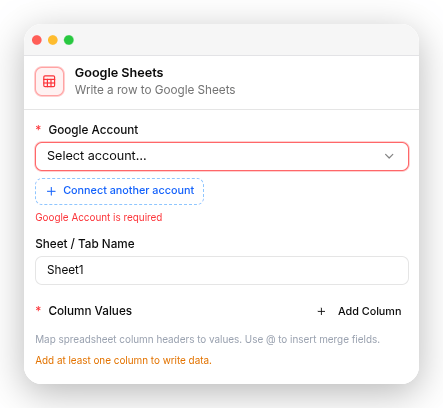
Google Sheets
What it does. Adds a new row to a Google Sheet each time the flow reaches this step. When to use it. Use it to automatically save leads, orders, return requests, survey responses, or any other customer information in Google Sheets. How to set it up.1
Choose the Google Account (required)
Pick a connected account, or click Connect another account to add one.
2
Pick the Spreadsheet (required)
Your spreadsheets load automatically. Choose the one you want to write into, or type a name in the box below the list and click Create to make a new one on the spot.
3
Set the Sheet / Tab Name
Optional. The tab within that spreadsheet — leave it as
Sheet1 unless you keep your data on a differently named tab.4
Map your Column Values (required)
Click Add Column for each one. Give it a header, then set the value — type @ to insert a merge field such as the contact’s name or an answer you collected earlier. Add at least one column, or the step has nothing to write.
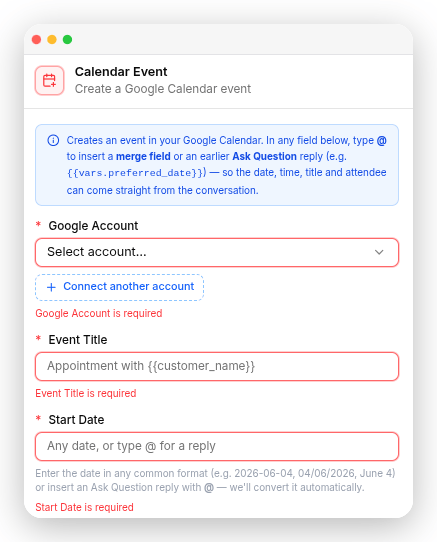
Calendar Event
What it does. Creates an event in your Google Calendar using details the customer gave you. When to use it. Callbacks, site visits, consultations, demos — anything where a time agreed on WhatsApp should also appear in your calendar. How to set it up.1
Choose the Google Account (required)
Pick the connected account, or click Connect another account to add one.
2
Choose the Calendar
Optional. Pick which of that account’s calendars the event should go into, or create a new one by name. Leave it blank and the event goes to your primary calendar.
3
Write the Event Title (required)
For example,
Call with {'{{contact.first_name}}'}.4
Set the Start Date (required)
Type a date in any common format —
2026-06-04, 04/06/2026, June 4 — or press @ to use an answer the customer gave earlier. It’s converted into a proper date for you.5
Add the optional details
Start Time, End Date, End Time, Location, Attendee Email and Description are all optional, and @ works in any of them. Leave End Time blank and the event runs for an hour from the start. Fill in Attendee Email and the customer is sent a calendar invite.
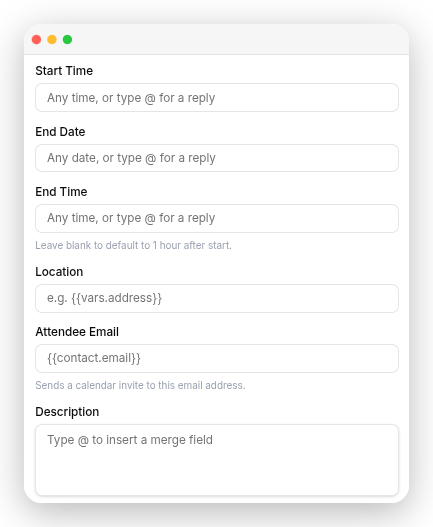
Title: Consultation — Start Date: Start Time: Location: Green Valley Clinic, Room 3 Attendee Email: Description: Booked through WhatsApp. Phone:The doctor sees it in their calendar, and because Attendee Email was filled in, the patient gets a Google invite by email too.
A worked example
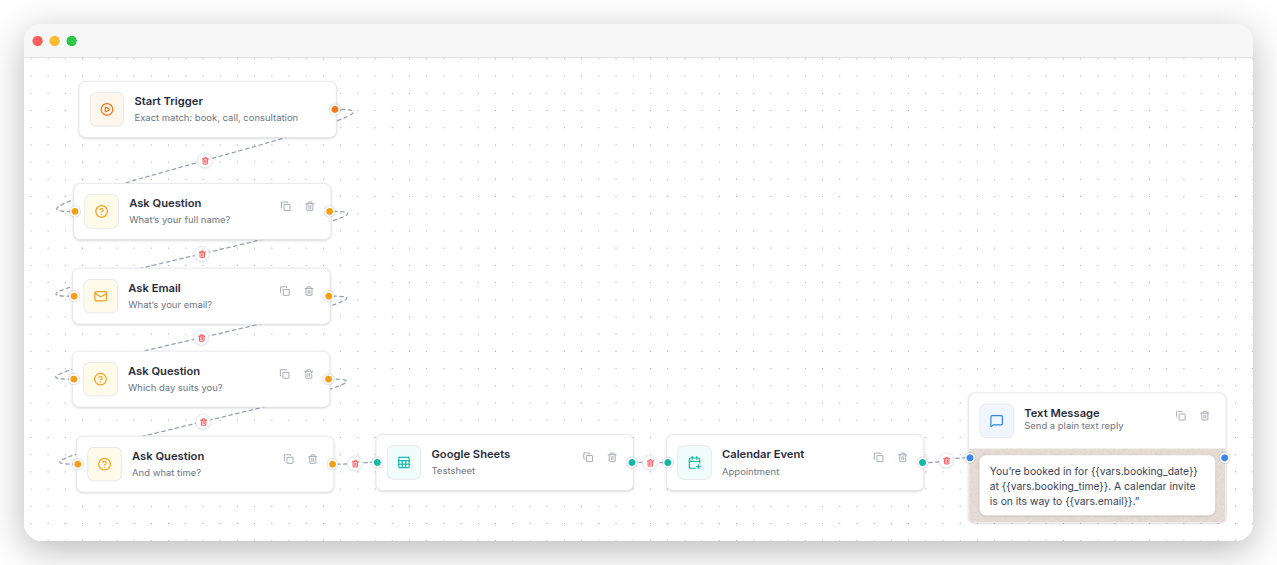
A consultancy books discovery calls end to end:- Start Trigger — When message contains
book,call,consultation. - Ask Question (Text) — “What’s your full name?” →
client_name - Ask Email — “What’s your email?” →
email - Ask Question (Date) — “Which day suits you?” →
booking_date - Ask Question (Text) — “And what time?” →
booking_time - Update Contact — save the name and email onto the contact record.
- Calendar Event — create the event from those answers.
- Google Sheets — log the same details as a row for the sales team.
- Text Message — “You’re booked in for at . A calendar invite is on its way to .”
What’s next
Google Accounts
Connect the Google account these steps use.
Merge Fields
Use saved answers in any field by typing @.