

How the builder works
1
Open the builder
Go to Automations in the sidebar, click the menu icon at the end of a flow’s row, and click Flow Builder.
2
Set the Start Trigger
Every flow starts with a Start Trigger. Click it to choose who can start the flow and what should start it. For example, you can trigger the flow when someone sends a keyword or when an event occurs in your Shopify store.
3
Add flow steps
Pick a category tab at the top — Basic, Interactive, Ask, Advanced or Integrations — then click a tile, or drag it into the builder.
4
Join them up
Connect each flow step in the order you want the conversation to happen. The chatbot follows these connections from one step to the next.
5
Fill in each flow step
Click a flow step card to open its settings on the right. Then fill in the details required for that step, such as the message, buttons, questions, or other options.
6
Save
Click Save Flow at the top right. If any required fields are missing, the affected flow steps are highlighted in red, and the Save button stays disabled until you fix it.
The Start Trigger
Every flow begins here. The Start Trigger decides when your chatbot starts. Open the Start Trigger settings, then choose one of the two Trigger Sources.- Message — someone sends you a WhatsApp or Messenger message.
- Shopify — something happens to an order in your Shopify store.
Message
The most common choice. The flow starts when someone messages you.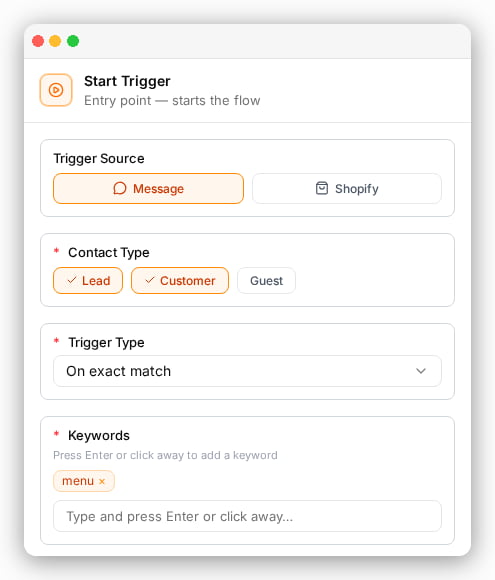
Keywords — Available only when On exact match or When message contains is selected. Enter a keyword and press Enter to add it. Add multiple keywords or common variations so customers can trigger the flow using different words.
Example. If you choose When Message Contains and add the keywords book, table, and reservation, messages like “Can I book a table for 4?” or “I’d like to make a reservation” will automatically start the booking flow.
Shopify
This flow runs automatically when an order changes in your connected Shopify store. Customers don’t need to send a message. ChatFlows uses the customer’s phone number to find the correct contact and start the flow.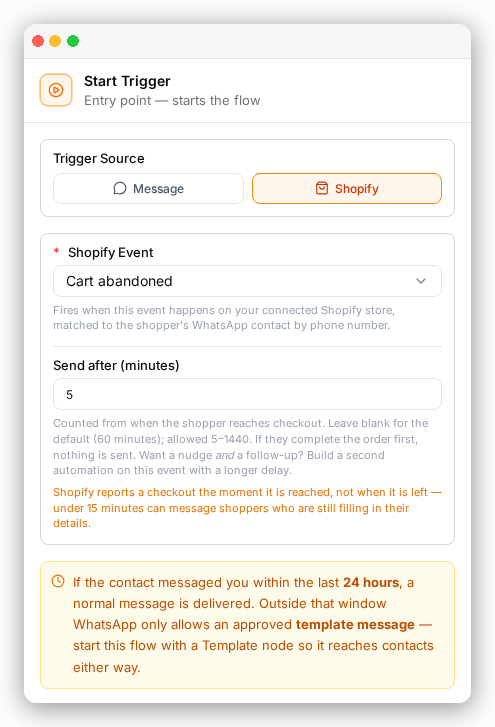
Send after (minutes). When you pick Cart abandoned, a Send after (minutes) box appears. It sets how long to wait before the flow starts. You can enter 5 to 1,440 minutes. If you leave it empty, the wait is 60 minutes. If the shopper completes the order first, nothing is sent. Under 15 minutes is usually too soon. Shopify reports a checkout as soon as the shopper reaches it, so they may still be filling in their details. See Recover abandoned carts.
What it’s for. Keep customers updated throughout their order journey. Use it to recover abandoned carts, send order updates, and reduce support questions like “Where’s my order?”
Example. Pick Cart abandoned and set Send after (minutes) to 60. Then send a WhatsApp template with a link back to their checkout. For a second reminder, create another cart-abandoned automation with a longer delay. Each one checks for an order before it sends.
The Order out for delivery and Order delivered triggers work only if your shipping carrier sends tracking updates to Shopify. If you mark orders as fulfilled manually, these triggers won’t run.
Shopify triggers need a connected store. See Your store and the Shopify app.
The five categories
Flow steps are organized into five categories. Each page explains every flow step in that category, what it does, and when to use it.Basic
The everyday replies — plain text, buttons, links, and approved templates.
Interactive
Lists, images, videos, documents, map pins, contact cards, and emoji reactions.
Ask
Ask a question and save the answer — name, phone, email, address, location, or a file.
Advanced
Waiting, branching, tagging, updating the contact, and calling other systems.
Integrations
Write a row to Google Sheets or create a Google Calendar event.
Builder tools
The toolbar at the top right of the page has a few helpers:- Undo and Redo — step back or forward through your changes.
- Snap to grid — keeps cards neatly aligned as you drag them.
- Auto-arrange layout — Automatically arranges the entire flow into a clean, left-to-right layout.
- Save Flow — saves your work. It’s disabled while any card has an error.
Some flow steps are available only on the platform that supports them. If you’re building a Messenger flow, WhatsApp-only steps are hidden. If you’re building a WhatsApp flow, Messenger Template is hidden.The WhatsApp-only steps are List Message, Call To Action, Contact Card, Reaction, WhatsApp Template, WhatsApp Flow, and Ask Location.
What’s next
Flow Collection
Start from a ready-made flow instead of an empty builder.
Generate with AI
Describe your flow in plain English and get a starting point.